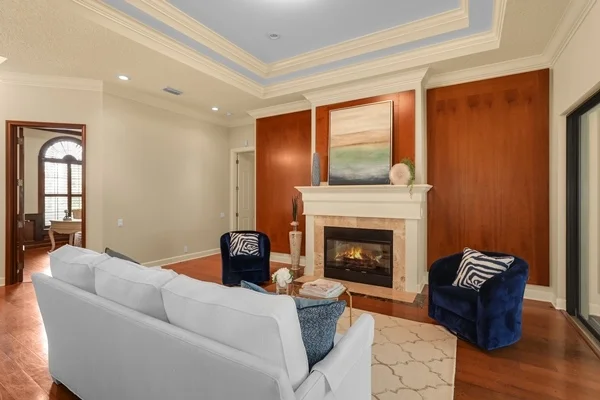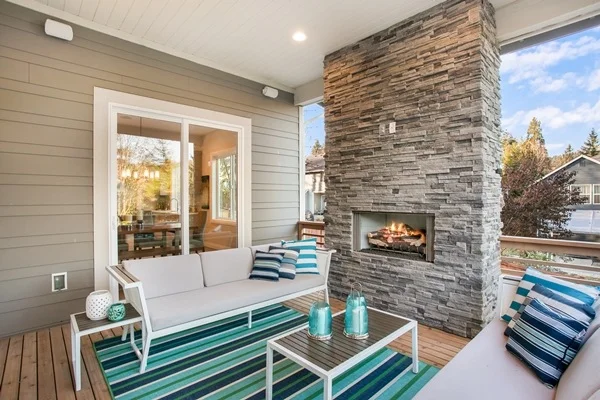
Selling a property through online or print media provides a lot of advantages to get to more people and hopefully land that prospective buyer. Properties boast a lot of features and highly differ with one another. Others have pools, luxurious backyards, and a huge play area for the kids. Some properties choose to showcase indoors with large spaces such as offices, playrooms, and living areas which to some people are more valuable than the space outdoors. Needless to say, one of the best features interiors can offer is a fireplace. It speaks of warmth and coziness especially during cold seasons and can be one of the property’s selling points. Families can gather around the fireplace, have a warm drink, and just enjoy the company of each other.
This is why when editing real estate photos, fire added to fireplaces makes an enormous impact in perception when perspective buyers view listings. A small fire can make a big difference in the way people view the room and eventually trickle the effect all the way to the decision stage. Fire added to fireplaces can also save your realtor some money. Instead of getting actual firewood and consuming it, you can leave the wood in there and just edit it in.
There are many ways to skin a cat. Putting some fire into a fireplace can be done through different methods as some software have built in templates for adding fire, where some can accommodate external images of fire which can be stitched into the image.

In countries where seasons change and winters are difficult to bear, properties with fireplaces will definitely sell as it provides a source of heat that is inexpensive. Taking advantage of the fact that the US endures cold climates can attract buyers towards homes that look warm. Also, giving color to an interior with a monotonous shade will help emphasize that feature of the home. When a room is empty or staging is not possible to help on the overall feel, fireplaces can help set the mood. Fire added to fireplaces are immense in value as people are able to visualize how the room looks and will always trump a room that looks quiet and dull.
The first method is similarly done with how a TV overlay is executed. It requires some stock photos of fires on fireplaces and the steps are simple to do. Photoshop is arguably the best and most common software to edit photos and fires added to fireplaces is almost done in a breeze with this program.
1. The first step is to open your editing software. Load the room of the interior with the fireplace and use it as the base layer of working.
2. Now open a new photo, and this should be the stock photo of the burning fireplace.
3. Use transform and distort on the photo of the burning fireplace so that you can form the photo over the shape of the fireplace. Do not be limited creatively when shooting fireplaces. Do not be afraid to shoot in angles or from the side and avoid shooting from the front to try and achieve an equal polygon. Remember than the distortion will allow you to work with even the most obscure shapes to pin your burning fireplace on.
4. When the photo of the burning fireplace is distortable, drag any corner and fit it to the frame of the fireplace. Press enter and it should render together the points automatically.
5. Click transform once again and choose to distort so you can further manipulate the stock photo of the burning fireplace.
6. Fit the rest of the remaining three corners to the frame and you are almost there. Adjust the brightness to blend in with the illumination of the room, making it look realistic and as if the fire was there the whole time.
The second way to do it in Photoshop does not require a stock photo. You would be surprised that the software has its own render flame feature that throws in a fire to your cold fireplace in an instant. To do this follow these simple steps to get that fire started in no time.
1. Start off with a pen tool to create a series of points where you want to put your fire. It is recommended that you begin at a point below the top to make it look like the fire is coming from the middle rather than the top to give it a realistic touch.
2. Now go to the filter tab, select render then select flame. You will be given options on how to make your fire look. Note that this will always produce one flame instead of multiple scattered embers so set it wisely.
3. The settings will ask you how thick or thin you want the fire to be, taking into consideration the amount of wood available in your photo of the interior.
4. Once you have found the flame you want, place it on the wood.
5. Use a layer mask to blend in the fire and the wood, making it look seamless and not stitched together. Use the color black to paint on the layer mask and touch on the points of intersection.
Voila, these are the two methods should you want fire added to fireplaces. Both can be done through Photoshop and require very simple steps to execute.
With the growing competitiveness of property advertising, producing pictures with high quality of enhancement is truly the way to go. Even the littlest details such as fireplaces can be noticed if it is not lit as it emits a coldness to whoever is viewing the image. Editing the fire in takes no time at all to do and can be done easily using available software. Overall, we recommend keeping an eye out for opportunities for these types of fixtures in real estate image editing and you will be able to help your real estate partners sell their listings in no time.
Replacing Overcast Skies in Real Estate Photography
Brown Grass Patches Replace With Green Grass Editing Technique